Baking bread at home is great, but you can run into some very annoying and difficult problems that leave you slightly disappointed with your bread.
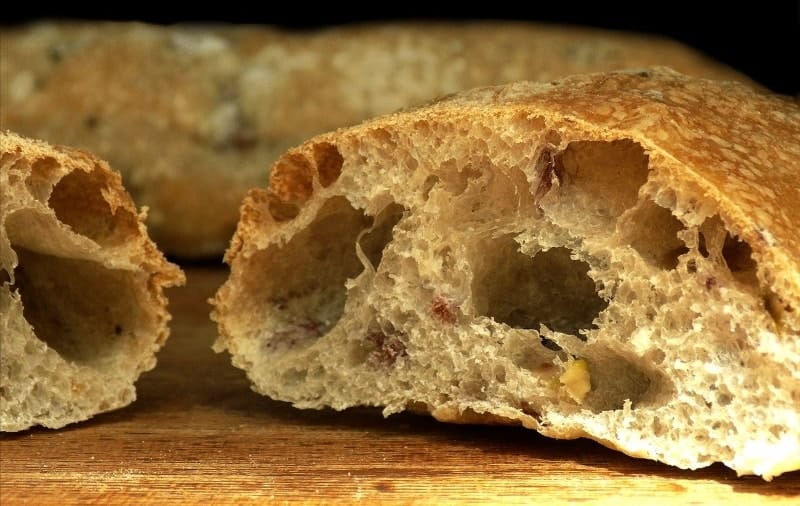
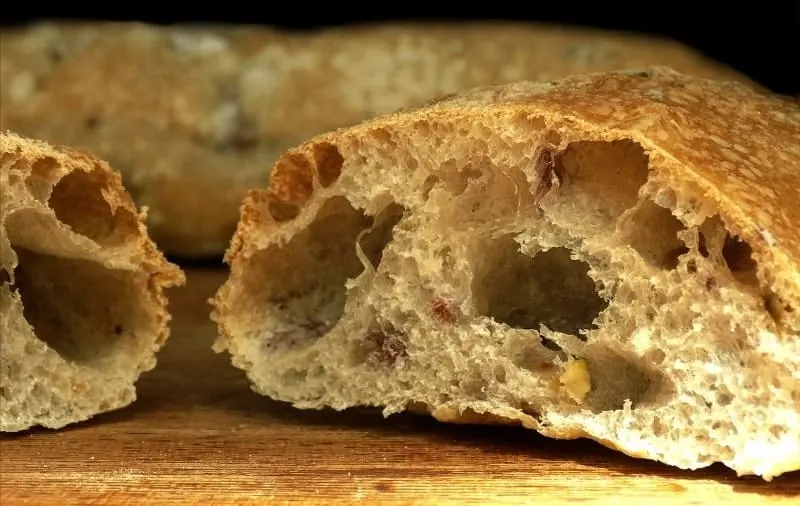
Your bread can look amazing, but cutting into it and seeing a big hole that you didn’t want is a punch in the face. Yes, it’s still good bread, but you’re not going to be able to butter a big hole in the middle of your slice.
This is a big problem for some people, but it’s nothing to be too worried about. It might have happened to you a few times, but you’ll soon be able to prevent it by identifying what’s causing it.
The primary cause of large holes in your bread is CO2 bubbles being trapped in the dough. If you want to avoid getting these holes, you need to get rid of these bubbles during the final shaping process by knocking or rolling them out.
Although this is the main cause, there are some secondary causes that often contribute to your dough holding large gas bubbles. Taking the time to think about your bread-making technique and process is an important part of avoiding mistakes and making great bread.
Take a thorough look through the causes and solutions to large, uneven holes in the lists below and you should be on the path to baking better bread.
What Could Be Causing Large, Uneven Holes To Form?
There are many things that can cause large holes to form in a loaf of bread, but nearly all of them lead to one main problem. Large pockets of trapped air.
Although it can sound like something that has a simple fix, it’s not always easy to prevent if you’re not sure what’s causing them.
The most important thing you can do for a tight, uniform crumb is to even out the distribution of gases in the dough. Without an even distribution, you’re almost certain to end up with random holes scattered aross your bread.
Take a look at the below 8 causes of holes in bread and consider how your process and technique may include them.
1. The Dough Had Risen Too Fast
Many home bakers aim for bread that has a very quick proofing time so they can make it as fast as possible. Now, that’s completely fine if you want to do that, but faster proofing often leaves you with a bread that’s not as good as something that’s had time to rise slowly and develop more flavor.
It’s recommended by a lot of people to keep your bread in a warm area so that you can speed up the rise slightly. I believe a warm oven is recommended to most home bakers. This is all well and good for making quick bread, but if you’re allowing your oven to get too warm, it will cause some problems.
Keeping your dough in an area that’s very warm can speed up yeast activity, causing a faster rise. If this rise is too fast, it can cause large and irregular pockets of gas to form.
You want to avoid this as best you can, so I recommend leaving your dough to proof in a place that’s free from draughts and at room temperature. This will likely take a bit longer, especially if you’re in a colder climate, but it will leave you with a much better end product.
If you don’t want to leave your dough at room temperature, just make sure that your oven is at a temperature that’s barely warm. You still want a slower rise.
2. It Had An Uneven Rise
If your dough is put in an area that causes it to proof faster on one side over the other, there will be gas pockets forming unevenly and you’ll see a combination of both large and small holes in your bread.
Heat often plays a big role in an uneven rise. If you’re proofing your dough somewhere with a strong source of heat, the side of the dough that’s closest to it will rise more than the other side.
This problem often occurs when putting dough near your oven whilst it’s hot. The heat that the dough is getting isn’t good for its rise and won’t leave you with a great loaf of bread.
Try to avoid leaving your dough anywhere near areas that distribute enough heat to warm it up. It’s best to keep in on your countertop, in a cupboard, or in a turned off oven to get the best proof.
3. It Was Underproofed
When a ball of dough hasn’t been proofed for long enough, we call this underproofed. This means that the dough hasn’t risen sufficiently because there hasn’t been enough yeast activity (AKA not enough gas production).
Underproofed dough often has a huge rise in the oven, but you’re left with bread that’s often torn, has an uneven crumb, and isn’t visually appealing.
When you put underproofed dough in the oven to bake, the yeast has plenty of remaining energy, so it’s able to produce a lot more gas than it needs.
This excessive amount of gas is enough to break the structure of your bread. It can actually cause the small pockets of gas inside the bread to tear into larger pockets, causing large holes in your bread. It can also cause heavy tearing all around the loaf, which definitely ruins its appearance.
To know when your bread is proofed, it should be roughly doubled in size and respond appropriately when you poke it. To test it, poke your finger 0.5-1 inch into your dough. If it’s ready, the indentation should remain but spring back very slowly
4. There Was Too Much Yeast
Good bread takes time, so I don’t particularly agree with most bread that is ready to bake in just a couple of hours. Bread that has a very fast proofing time often has a basic flavor rather than the complexity you get with a much longer proof.
Just like how a lot of people put their dough in a warm area to speed up the rise, plenty of people also put an excessive amount of yeast into it.
This excessive amount of yeast can produce far too much gas at once, which will likely leave you with a damaged gluten structure and very large holes.
A lot of recipes call for a standard packet of active dry or instant yeast, but you really don’t need that much to make good bread.
Putting in half or even a quarter of what the recipe calls for can improve the quality of the rise and overall flavor of the bread.
It will take longer for your dough to proof when it has less yeast, but it means that you don’t have to worry as much about large and irregular holes forming in your loaf too quickly. This slow rise can also help if you’re busy with something and need to slow down the overall time it takes to make your bread.
Next time you make bread and have plenty of time, just try cutting the amount of yeast down to half of what you’d normally call for. You’ll see that you get the same or even better results.
5. It’s The Type Of Bread You’re Making
Not all bread is meant to have a tight and even crumb, so it’s a good idea to double-check how your bread is actually meant to turn out.
If you’re making something like traditional sourdough bread, you’re going to want to get plenty of medium-large holes by the time it’s baked.
If you’re using a high hydration dough and building lots of structure, you will most likely end up with bread that has large holes in it. Of course, there are things you can do to prevent these holes, but certain types of bread traditional have holey crumbs, so it’s nothing to worry about.
If you don’t like holes, you should try recipes for different kinds of bread until you find something that fits your preference.
6. It Had A Weak Gluten Structure
One thing you absolutely need for good bread is plenty of gluten development. Gluten is an essential component in bread that helps to create the structure of the crumb and allows the bread to rise without bursting.
Without enough gluten, you’re not going to get a good rise in your dough and the gas pockets inside will likely burst. These burst pockets can form large holes in your bread.
You develop enough gluten in your bread through kneading and using a high protein flour.
By kneading your dough you’re turning proteins in the flour into gluten. The more you knead your dough, the more gluten you develop, so it creates a better structure and therefore supports the gas in the dough.
Gluten also develops on it’s own over time in high hydration doughs.
Using flour with high protein content, like strong white bread flour, does a lot in helping you make better bread. To put it very simply, the higher the protein content, the more gluten you’re going to be able to develop in your dough. For this reason, it’s best to avoid using lower protein flour like all-purpose when making most types of bread.
7. Oil Or Flour Was Folded In When Shaping
It’s easy to make the mistake of incorporating a thin layer of oil or flour into your dough whilst shaping it for the final proof. By doing this, you risk creating a large bubble inside the bread.
If you’re oiling your dough when you’re proofing it, there’s always a chance that you might struggle to shape it properly and accidentally fold in a layer of unincorporated oil.
This oil can prevent the seams of your dough from joining together when you’re shaping it since it won’t be sticky. It can create a large area where the gluten in the dough can’t connect, which means that you’ll have gas trapped in it.
Layering flour into your dough has a very similar effect to oil. It prevents the interior of the dough from sticking together and can lead to a large hole forming.
8. It’s The Oven You’re Using
Believe it or not, the oven you’re baking in could potentially be what’s causing you to have problems with your bread.
Whether it’s gas, electric, convection, or conventional, it might have some form of problem that’s affecting how your bread is turning out.
If you’re making countless loaves of bread and they’re all turning out to be disappointing no matter what you do, you should try another oven.
The easiest way to identify if it’s your oven causing your problems is to visit a friend or family member and use their oven. If it turns out better than your own, it’s likely that yours isn’t in good condition, you’re not using it right, or it’s not good enough to make bread
Whilst this won’t apply to most people, it’s definitely something you should consider.
How To Prevent Large Holes From Forming
Now that we’ve got the causes out of the way, it’s time to talk about ways to prevent those annoying holes from forming.
If you’ve identified what’s causing your bread to develop large holes then great, you should know what to do, but the following solutions are great advice for preventing them further.
Each of the below tips can be used individually, but they’re best used all together if you’re wanting a loaf of bread with an even crumb and minimal holes.
Cut Back On The Yeast
Like I’ve already said, a lot of basic bread recipes like to use an excessive amount of yeast so the dough rises quickly. A high amount of yeast can lead to a lot of problems, so it’s a good idea to rethink how much yeast you really need.
Yes, you may have to use an entire 7g packet of yeast if you’re needing to make bread in a short period of time, but if you’ve got the entire day or even time after a 12-24 hour long fridge proof, you can cut back the amount of yeast you use considerably.
By using half or even as little as a quarter of the amount you would normally use, you are going to siginifacntly improve your bread overall.
Simply go through your recipe as normal, but add less yeast and anticipate longer proofing times.
Let It Proof At Room Temperature
Don’t be tempted to turn your oven light on or use a proofing box if you’re struggling with large, uneven holes in your bread.
Instead, let your dough proof without the help of extra warmth so it can rise properly.
By leaving it at room temperature in a draught-free place, you’re allowing it to rise evenly and at its own rate. This helps to prevent irregular holes whilst improving the flavor of your bread.
Even Out The Gas Pockets By Punch Your Dough Down
When you’re handling dough and you don’t want it to have an uneven crumb, you need to be firm with it.
After the initial rise, you need to even out the distribution of gas in the dough. This means that you should gently knock gas out of the dough until you’re happy with how it’s looking. If you don’t knock enough gas out, you’ll be left with holes scattered around your bread.
One method to doing this is to simply put your dough onto your work surface and gently release the gas by pushing it down with your fingers. Be careful not the tear the dough during this stage as you don’t want to damage the gluten.
Alternatively, you can knead the dough for a few minutes after punching it down so everything gets redistributed.
Another method that can work quite well if you’re baking in a loaf tin is by using a rolling pin to push out the gas and roll your dough to an even layer. Once it’s rolled out, you can then laminate it and tightly roll it back up into a log to be placed in your loaf tin. For a visual example, take a look at the video below.
Make Sure To Develop Enough Gluten
Having plenty of gluten developed is key to making bread that rises sufficiently, and maintains it’s structure, so it’s essential that you spend enough time kneading and developing gluten in your dough.
Use the right flour too. Strong white bread flour is best if you’re struggling to get a good structure with your bread, but many more advanced bakers like to make bread with a combination of different flours for added flavor.
Enrich Your Dough
Adding ingredients like milk, eggs, butter, or oil to your dough can help in leaving you with a tight but light crumb.
These ingredients may help to prevent large air bubbles from forming in your bread, so it’s worth experimenting with them and seeing which one you like the most.
Milk and butter are my personal favorites to add if I’m wanting a more close-textured crumb.
I go more into depth on what these ingredients can do to affect your bread in this article.