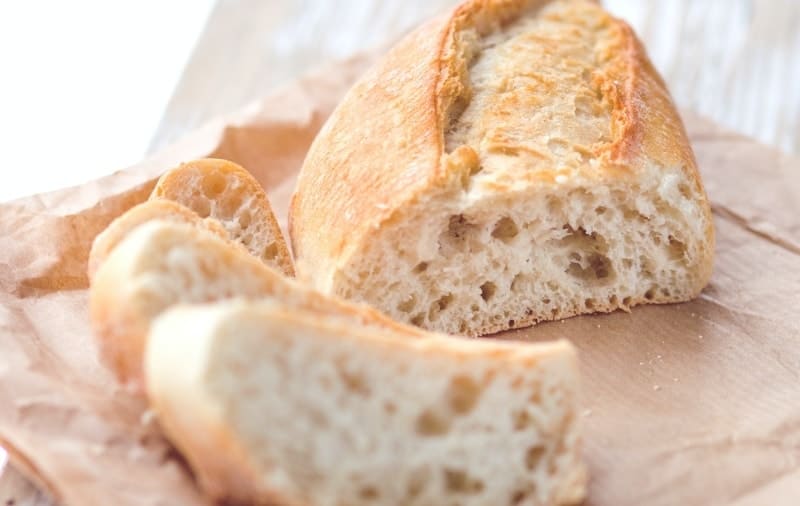
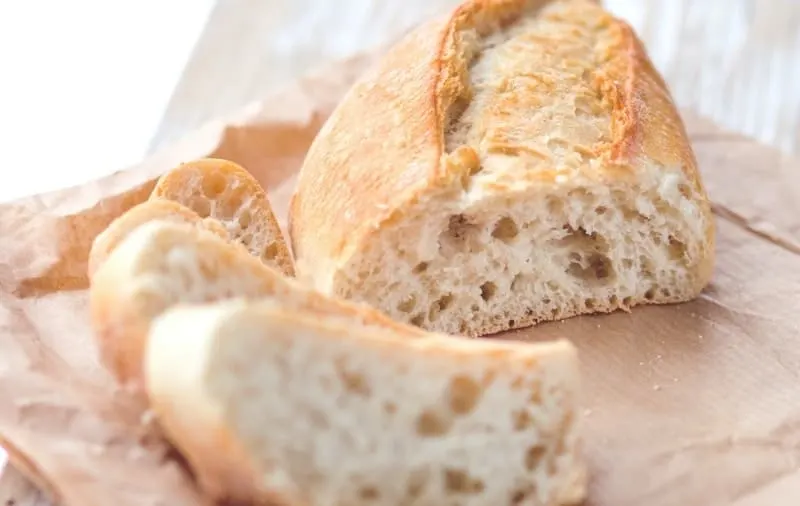
There’s something very satisfying about slicing into bread and seeing that it has a network of large holes in the crumb. This bread is great for dipping or eating on its own as it’s so tasty.
Bread with plenty of large holes is known as an ‘open crumb’. There are plenty of different kinds of crumbs in bread, but getting a nice open crumb is desired by so many bakers.
There are groups of bakers that strive for a closed and tight crumb whilst others want something filled with holes. The methods used for a tight crumb vs an open crumb vary greatly and it takes a good amount of practice to get it right.
An open crumb is simple on paper, but it’s up to you to learn the methods to make great open bread at home. Whether it’s sourdough or just a standard yeasted artisanal loaf, you can still get a great crumb, but you first need to understand what makes an open crumb.
3 Simple Things That You NEED To Understand
Gluten Development
Gluten is an extremely important component for a good bread rise. Without it, the bread wouldn’t hold its shape, it wouldn’t have air pockets, and it wouldn’t be good bread.
Gluten can be developed through chemical action (with time) or through mechanical action (by kneading and mixing it). For large holes, it’s often best to allow plenty of time for the gluten to develop on its own rather than straight kneading.
To get the large holes you see in bread like sourdough or ciabatta, you want to build as much gluten as you can so it has the strength to hold large pockets of air.
A dough with an excellent gluten net will pass the windowpane test with ease. You should be able to grab the top of your dough and stretch it extremely thin without any signs of tearing.
The better the windowpane, the better gluten development there is. This ability to be stretched extremely thin shows us that the dough will be able to hold large pockets of gas.
How To Properly Develop Gluten
The first thing you can do that’s a game-changer in terms of developing gluten is an autolyse.
An autolyse is as simple as mixing the flour and water together until combined and allowing it to sit for a while. A good amount of time to autolyse the mixture is at least one hour but two is even better. The longer you leave it, the more gluten it’ll develop on its own.
By doing this before adding any other ingredients, you’re jump starting the gluten development and already improving what your dough will turn out like.
After an autolyse, you can add the salt and levain and continue to build gluten as normal.
You can build more gluten using a series of stretch and folds, lamination, coil folds, and so on.
The way you build the gluten is down to what you like to do. You should experiment with different methods to find your personal preference.
My favorite way to develop gluten goes like this:
- Autolyse
- Add Levain And Knead (Rubaud Method)
- Rest
- Add Salt And Knead (Rubaud Method)
- Rest
- Laminate
- Rest
- Series Of Coil Folds And Rests
- Shape, Proof, Bake
The rest periods and method I use does vary from time-to-time depending on what I’m up to, but this is my go-to method for building enough gluten to get a great sourdough loaf.
Correct Fermentation
To get the best crumb possible, you need to make sure that you’re properly fermenting your dough. You can’t underproof or overproof it or it won’t turn out very well, so it’s essential that you understand when your dough is ready.
Fortunately, by using a starter or lowering the amount of yeast you use, you’ve got a good timeframe in which your dough is able to properly ferment. It’s not too hard to know when the dough fully fermented, but it takes some practice to get it right.
One great benefit to a long bulk fermentation is the additional gluten development. Over time, the flour will continue to absorb more water and develop the gluten network further. So, if you don’t manage to get the fermentation right, you’re not going to get the crumb structure you want.
To get an open crumb, you need to make sure that your dough has had enough time to ferment and produce the gas necessary to inflate the pockets in the dough.
The problem with underfermented dough is that it likely won’t have developed the gluten structure or gas you need so it won’t leave you with that open structure you desire.
On the other hand, over fermented dough will start to break down until it becomes a wet and sticky mess that has lost all gluten development.
I can’t tell you an X amount of time to allow for your bulk ferment as it depends on so many variables that it’s near impossible to predict, so it’s down to you to learn what a good bulk ferment looks like.
Building Structure
You don’t have a whole lot of control over building the structure of your dough. The structure you get is nearly completely built during the bulk fermentation process.
Since the bulk ferment plays such a big role in developing the gluten network and gas production, it creates the structure itself
That’s not to say that you have no control over it though. You need to be be able to assist with gluten development and know when the dough is fully proofed so you can know when to move onto the next step.
You’re aiming for a point where the dough has an open structure. When you know that your dough has an open structure, you’ll know that you’ll be able to get an open crumb.
To get a great crumb, you need to make sure that there’s adequate gas production and that there’s something to hold that gas. You know that you’ll have gas production by using a healthy starter or yeast and you’ll need a strong gluten network to hold on to it.
To put it very simply, the structure of dough is built by proper gluten development and gas production.
Those are the main points to getting a more open crumb, but they’re by no means the only things you can do to help yourself.
There are certain things you can do throughout the entire process to help improve the crumb of the dough overall. Take a look below for some tips to further improve the holes in your crumb.
Additional Tips For Getting A Hole-Filled Crumb
Without a lot of experience, there are a lot of small things that you might not always notice. Certain techniques, timings, and ingredients are easily looked past and these missed methods can often be what leaves you disappointed with your bread.
Here are some tips to think about when you next try and make bread with a hole-filled crumb.
Steam Is A Game Changer
One thing you need for an open crumb is steam. If you’ve never used steam when baking bread, you’re going to be pleasantly surprised by how much it can improve the oven spring of your loaves.
To put it simply, steam prevents the exterior of your dough from forming into a crust. This allows the bread to expand more and therefore have more of an open crumb.
To get the best oven spring, you’re going to need very high heat and plenty of steam.
Steam is can be added to your oven in a few good ways. Some people use dutch ovens to trap moisture whilst others will use hot or cold water to create instant steam in their oven.
I go through more ways of adding steam to your oven in an article here.
To get a good amount of steam, the most important thing is to use high heat. Without a high heat, the dough isn’t going to expand as much in the oven and your crumb won’t be as open.
High Hydration Can Really Help
It’s definitely not necessary to use a very high hydration dough to get an open crumb, but it can help a lot. Think about how wet ciabatta dough is and how that translates to its crumb.
For a good open crumb, you’re going to want to stay at a water content of at least 70%, but more is often better – if you know how to handle it. Of course, if you’re not experienced with wet doughs, you’re going to want to stay at a water content that you can handle and make good bread at that level before you get any higher.
I personally like to make my sourdough at around 75-80% hydration and they come out with a great open crumb.
A Long Rise Is Best
When I say ‘long’, I basically mean something that’s not quickly proofed and ready to bake in a 2-5 hour window.
For an open crumb, you need something that’s going to take a while to fully ferment so the gluten can be completely developed and it produces enough gas to fill the pockets in the dough.
A good dough with a great open crumb can take a couple of days to make, so it’s important that you don’t rush through the process or become impatient. Rushing through things often leaves you disappointed.
By using a sourdough starter, you’re already lengthening the amount of time it takes for your dough to rise, so you will most likely be fine using that.
If you’re using yeast, use significantly less than you would in a normal recipe. 1-3 grams should do great, with less taking longer to rise.
Take the temperature into consideration too. Do your best to keep your dough in a cool place that will slightly extend the rise. If you’re in a particularly warm area, you might want to find an area in a cold cupboard or room.
Make Sure Your Starter Is Strong
Having a starter that consistently rises and falls is essential for getting a good rise in your bread.
Without a good rise, you won’t get a good crumb, so all your hard work will leave you with a dense and heavy loaf of bread.
A starter is best used once it’s aged a few weeks or a few months. It’s safer to use a starter that’s older, but a young starter can still have the potential to give a great rise to your bread.
You’ll know that your starter is strong if it’s consistently doubling in size within 4-8 hours of feeding and if it’s not developing hooch (a layer of liquid) on the surface.
You can even test out its ability to act as a levain on a small amount of dough if you are really wanting to see how well it works.
Be sure to always use your starter at the right time. It’s best used when it has peaked and just before it starts to fall under its own weight. At this point, it’s ripe and ready to use in your recipe.
Handle It Gently
The last thing you want to do is knock the air out of your dough after you’ve spent the time building it up, so you need to make sure that you’re being gentle with it.
It’s not very easy to pop the gas pockets in a well-developed dough, but you’ll do just that with improper handling.
You should be very careful with your dough, being cautious not to stretch it too much or compress it.
Never knock down your dough after the first proof. You want to maintain the gas in the dough so you can get those largers pockets.
When shaping the dough, make sure to use plenty of flour on one side to ensure it doesn’t stick and carefully fold and shape the other side with your hand.
Use a dough scraper where you can. This will help you more easily handle the dough without risking compressing it too much with your fingers.